New forms

I have spent a number of days re-making bending and building forms. Why? I changed the body shape slightly. I used to have the neck area, where the neck attaches, flat. Originally this made the neck easier to fit, but with new jigs and techniques having a rounded neck area is just as easy as flat, and I like the look of a more rounded instrument.

Radiused end blocks. To go along with the rounder instrument outline, I have made the head and tail block areas of known radii, so I can cut blocks of just the right radius. Since I have the jig out, may as well make a bunch in different woods. I like to use darker blocks with darker sides/back and lighter colored blocks with lighter colored sides/back. This collection should last me a while! Because of the difference radii across the different instrument sizes I stacked them where they will go so I could make an evenly distributed bunch.

Brace yourself

I have been making my top braces out of a chunk of Port Orford cedar. It was cut from a beach log (there are marine worm holes along one edge.) Port Orford cedar is very light and stiff, and maybe being in the ocean made this board even stiffer, but in any case the sound from my instruments improved when I moved to this material for top braces.
You want the wood fibers of a brace to run along the whole brace, not slant off the side (call run-out). The way to avoid run-out is to split the wood and the split naturally runs down the fibers. Using this split face one can then saw out the braces. The board I have is flat sawn, and you want the growth rings to go up-and-down in the brace from maximum stiffness. So I cut out lengths for various braces (concert, tenor, etc.), then split the board to establish the fiber direction with an eye to getting the grain lines perpendicular to the split face.

I then clean up the the pieces to rectangular cross sections using the split reference face to keep the wood fibers aligned with the brace.

Finally I saw out rough brace stock with the growth rings going up and down in the eventual brace.  These are tall slabs.  The eventual height of the brace will be determined by how much stiffness/bracing a given piece of top wood wants.


binding

I am taking a bit of a break from actual building, given the demands of a new old house, over-grown gardens, and a little carpal tunnel flare-up.  But I have decided to at least make parts, enough so I don’t have to worry about having them around when I get back to building instruments.

I cut my own bindings, for a number of different reasons.  To purchase them can get expensive, I can make them up with different and more interesting woods, I can experiment with different woods that are not at all commercially available.  To this end I have a collection of pieces of wood to make into bindings.  Off-cuts from making sides/backs, odd things I have purchased, stuff from the way-back collection, etc.  The process of making bindings is as follows.

First the wood is sawn on the big bandsaw into thin pieces.  These are then run through the thickness sander to remove the saw-marks and get the thickness down the .08 – .09 inches, which is my standard binding thickness.

Once the piece is the correct thickness (I do a bunch at once) they are ready to be sawn into binding.  I do this on my small inexpensive bandsaw which is just right for light sawing.  I use a sawblade with 35 teeth/inch.  It is actually a metal cutting blade, but it saws wood just fine, and the fine teeth do a nice clean job on the strips of thin wood.

Once things are cut up into binding strips, one has to deal with the saw marks on the edge of the binding left from the above saw.  The binding edge must also be smooth and square to the face so that when it is glued into the ledge routed for the binding in the side of the instrument it fits with no gaps.

To process the edge I made up a board with a straight edge and three circles out of 1/8″ plywood that are screwed down with off-center screws.  By rotating these off-center circles I can clamp a set of bindings vertically against the straight edge.

With a whole bunch of binding clamped into the jig, I run it through the thickness sander.  This sands the edge smooth, flat, and right angles to the binding face.  I then flip the set of bindings over, and do the other edge.  The result is a whole set of bindings that are completely uniform in height, with nice sharp square edges.

I keep the set together so that when choosing binding for an instrument one gets a set that are uniform in height.  Different colors of koa and black bog oak here.

end blocks

There are two end blocks in an instrument, one for where the neck attaches (the head block) and one at the bottom of the instrument, the tail block.  These are there to provide gluing surface to join the sides, and (for the head block) provide support for neck attachment.  I used to have the head block as flat, as early on this made fitting the neck easier.  However, with the way I do things now having the head block be flat is not required.  I much prefer that the overall shape of the instrument, both the head and the tail, be rounded/curved.  I re-did my instrument outline, and the forms used to build the instruments last fall.  As part of this I made sure that the curves for both the head and tail area, at least where the sides attach, are circular, with a known radius.  Of course, the radius varies between the head and tail, and varies with the size of the instrument.  I have the radius noted on all the templates for the instruments.

I make up the blocks a standard size, and then cut the radius using a small jig and the disk sander.  The jig consists of an arm with holes for different radii and a clamp on one end to clamp the end block.

This arm fits over a pin on a base board, which is clamped to the table of the disk sander.  Swinging the arm quickly sands a perfect radius on the block.

The result is a smooth, accurate, repeatable radiused block.  I make them up for the different radii I use for different instruments, in different woods, since I like dark colored blocks for dark sides/back and light colored blocks for light colored sides/back.

sharp

It is important to get one’s tools as sharp as possible.  I have a good set of wet stones, ending in a very fine polishing stone.  I can achieve a pretty good edge with these, but some how it was not as razor sharp as I would like.  Razors are stropped as a final step, to produce a smooth ultimately sharp edge.  So ….. I decided to build myself a power strop.

Call me ‘frugal’, or maybe it is just that I like to see what I can make with odd parts.  I took the motor out of a an old dishwasher that was out on the curb for the trash.  Built a little stand to hold the motor, made a disk out of some good plywood I have around, added a top piece of leather I ordered on-line, and rubbed in some 1 micron diamond polishing compound.

Boy does this thing put a mirror finish and a razor edge on tools quickly!  Just a few seconds and you are ready to shave the hair off the back of your arm.  Have not used things yet, but I also think that when tools get a bit dull a quick power strop will restore the razor edge without having to get out the sharpening stones.

Taking a rest

After finishing up the last set of instruments, I decided to take a bit of a break.  Of course, complete inactivity instrument-wise did not last long.  I have a couple of ‘experiments’ I have wanted to try, and decided that this would be a good time to build an experimental ukulele, which, if it did not work out, could be written off.  One of the things I wanted to try was an arm rest bevel.  I have been asked about doing one a couple of times, but never wanted the first attempt to be on a customer’s instrument.  I have built scoops, and an arm rest bevel is very much the same sort of thing.  After watching a number of videos, reading, etc. this is what I came up with as to how I approached the building of an arm rest bevel.

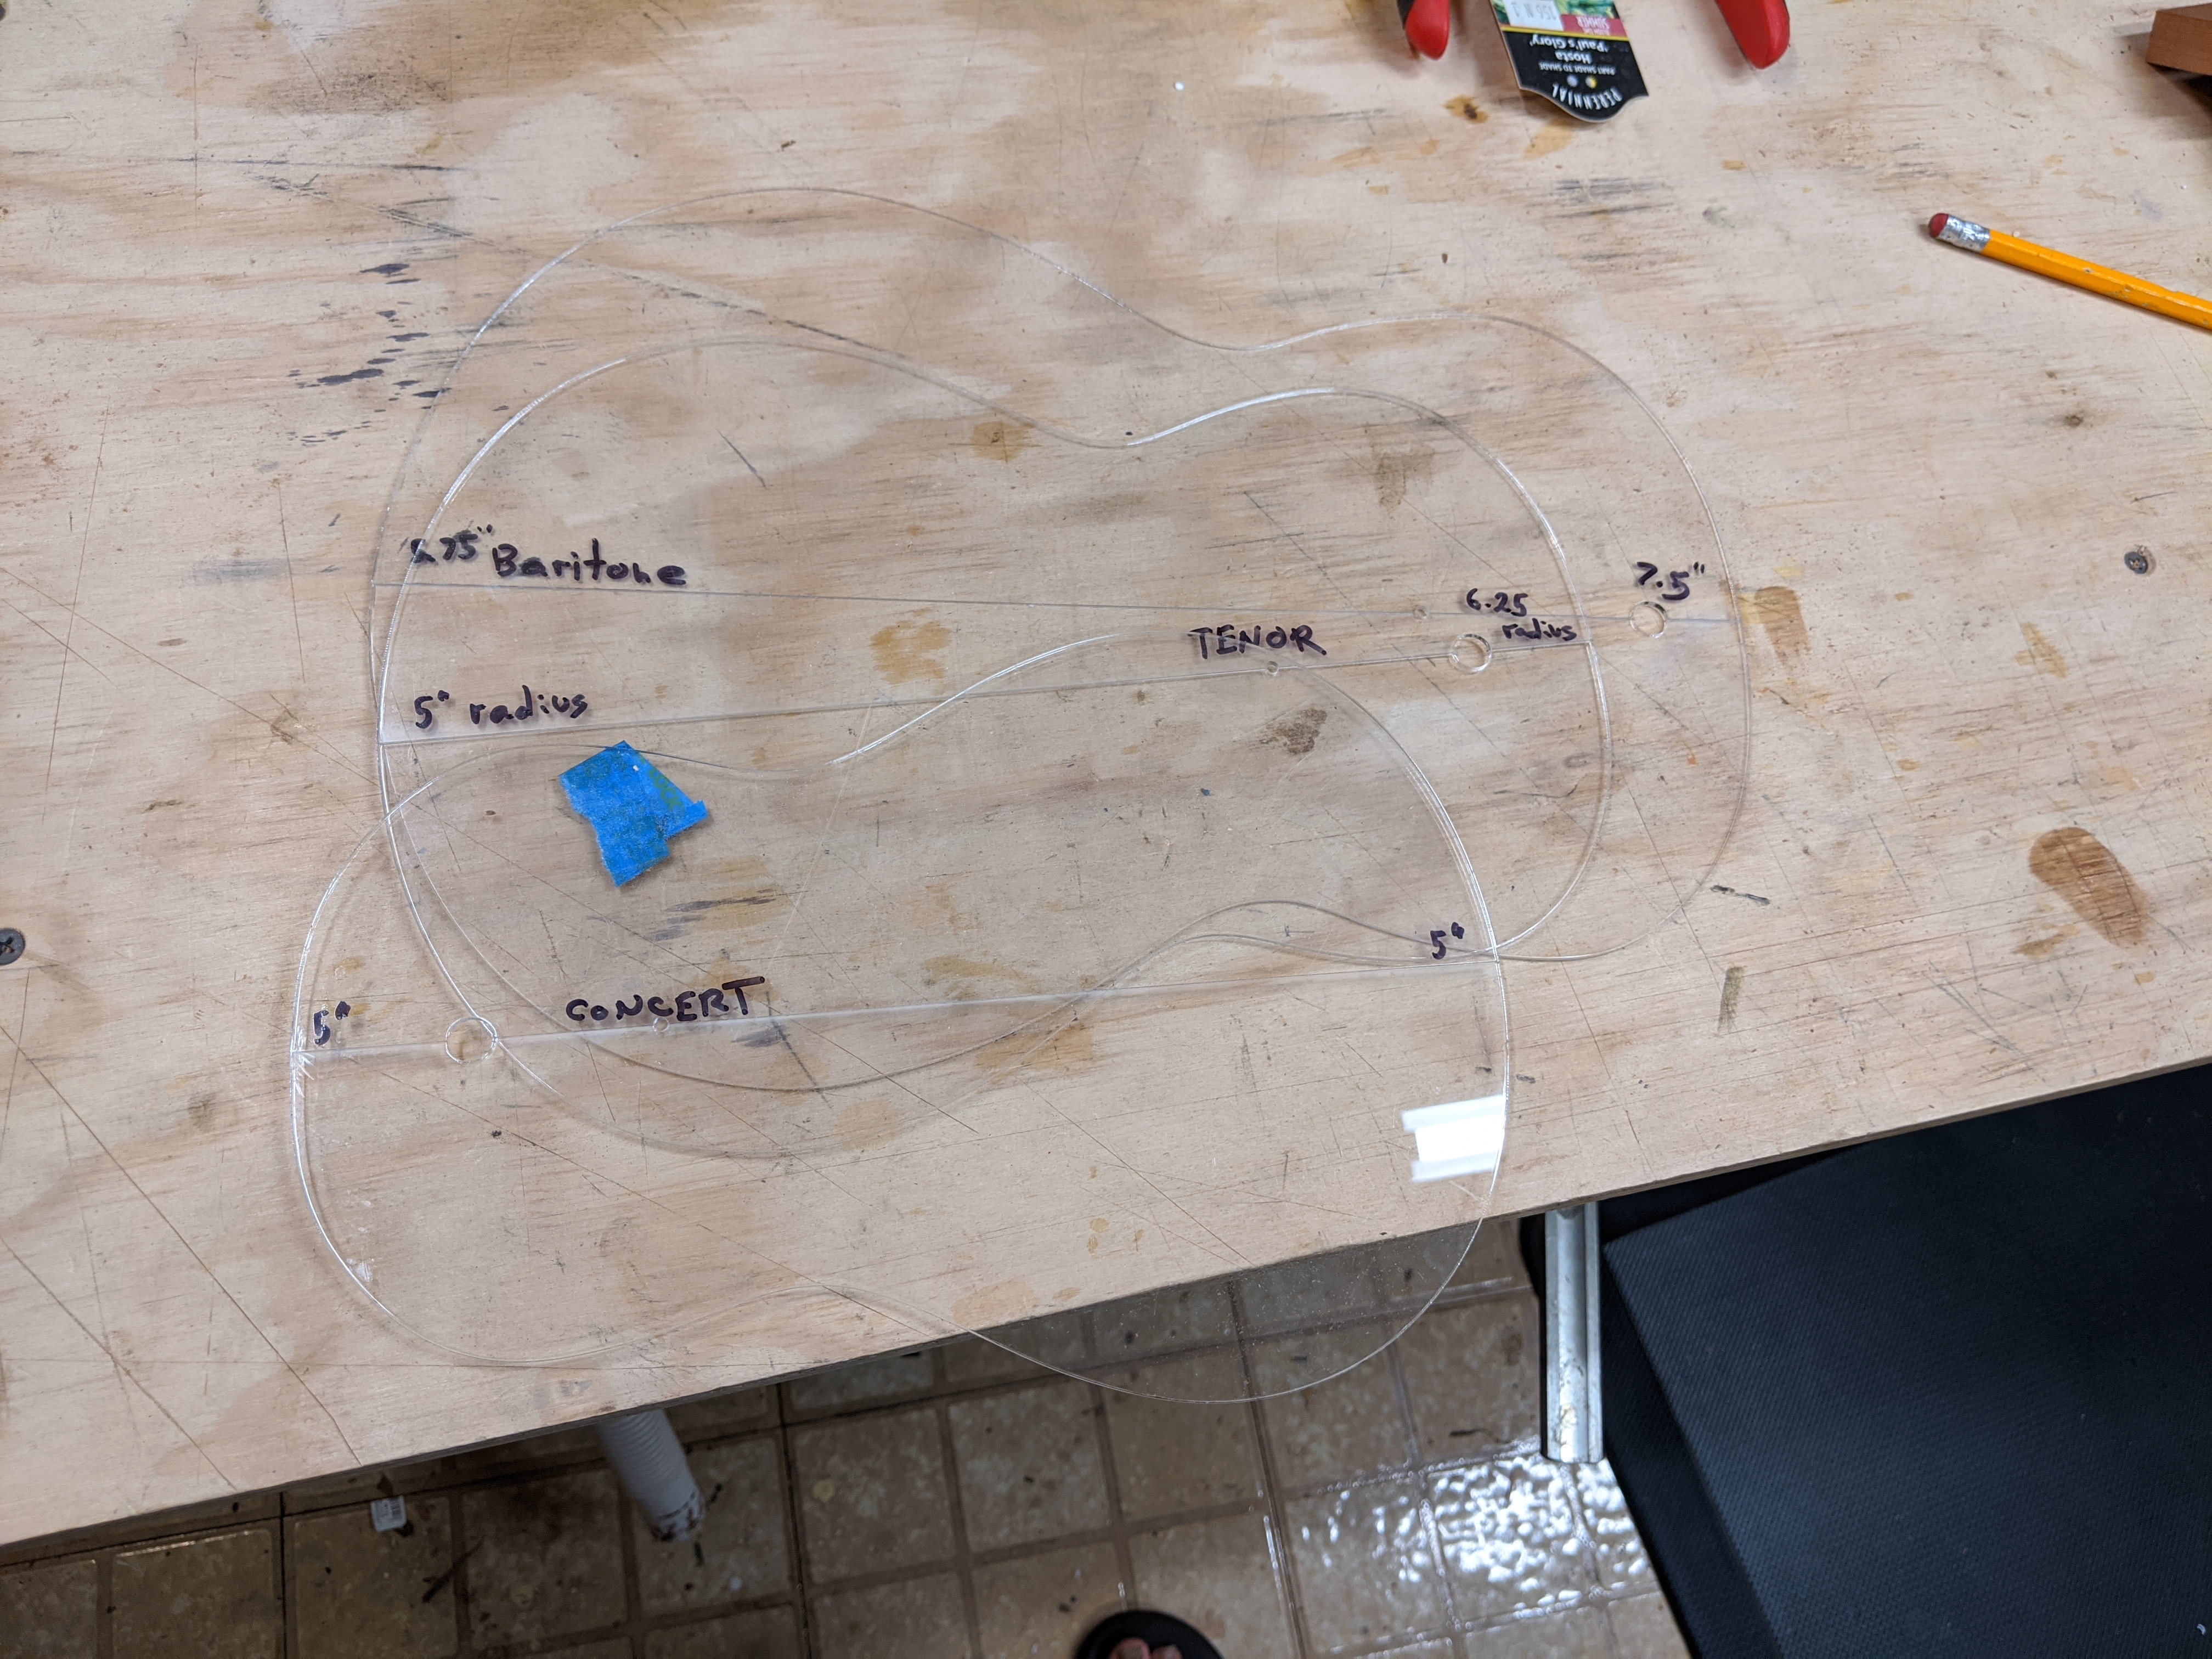
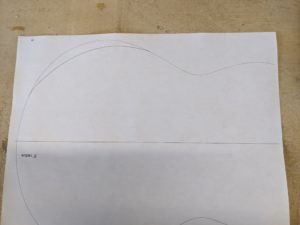
I first took my standard tenor template, and constructed an ‘inside’ line where the bevel would go.

Using this as an ‘inside’ pattern I cut a piece of poplar to go along the edge in place of the normal kerfing, to provide a place for the smaller top to be glued down, and the taper of the arm rest to be cut into the side.

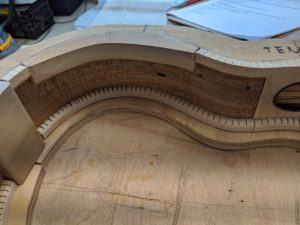
The top, before it is glued down, is cut along the ‘inside’ line.  Then when it is glued down the purfling can be run around the new inside edge.

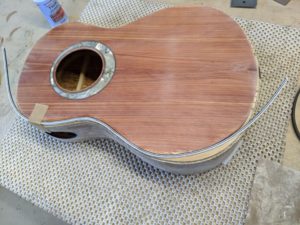
I glued the purfling down separately (without the binding).  The binding will be black bog oak.  Black is an easy color to match, and to fill in any possible small ‘problems’ so that is why I chose it for a first attempt.  Also, the purfling is black-white-black-white and relies on a black binding to provide the outside black edge..  I cut a piece of ebony to go against the purfling to fill out the top area to the edge of the binding route.  This will be cut into when shaping the bevel.

The binding was then applied around the body as normal.

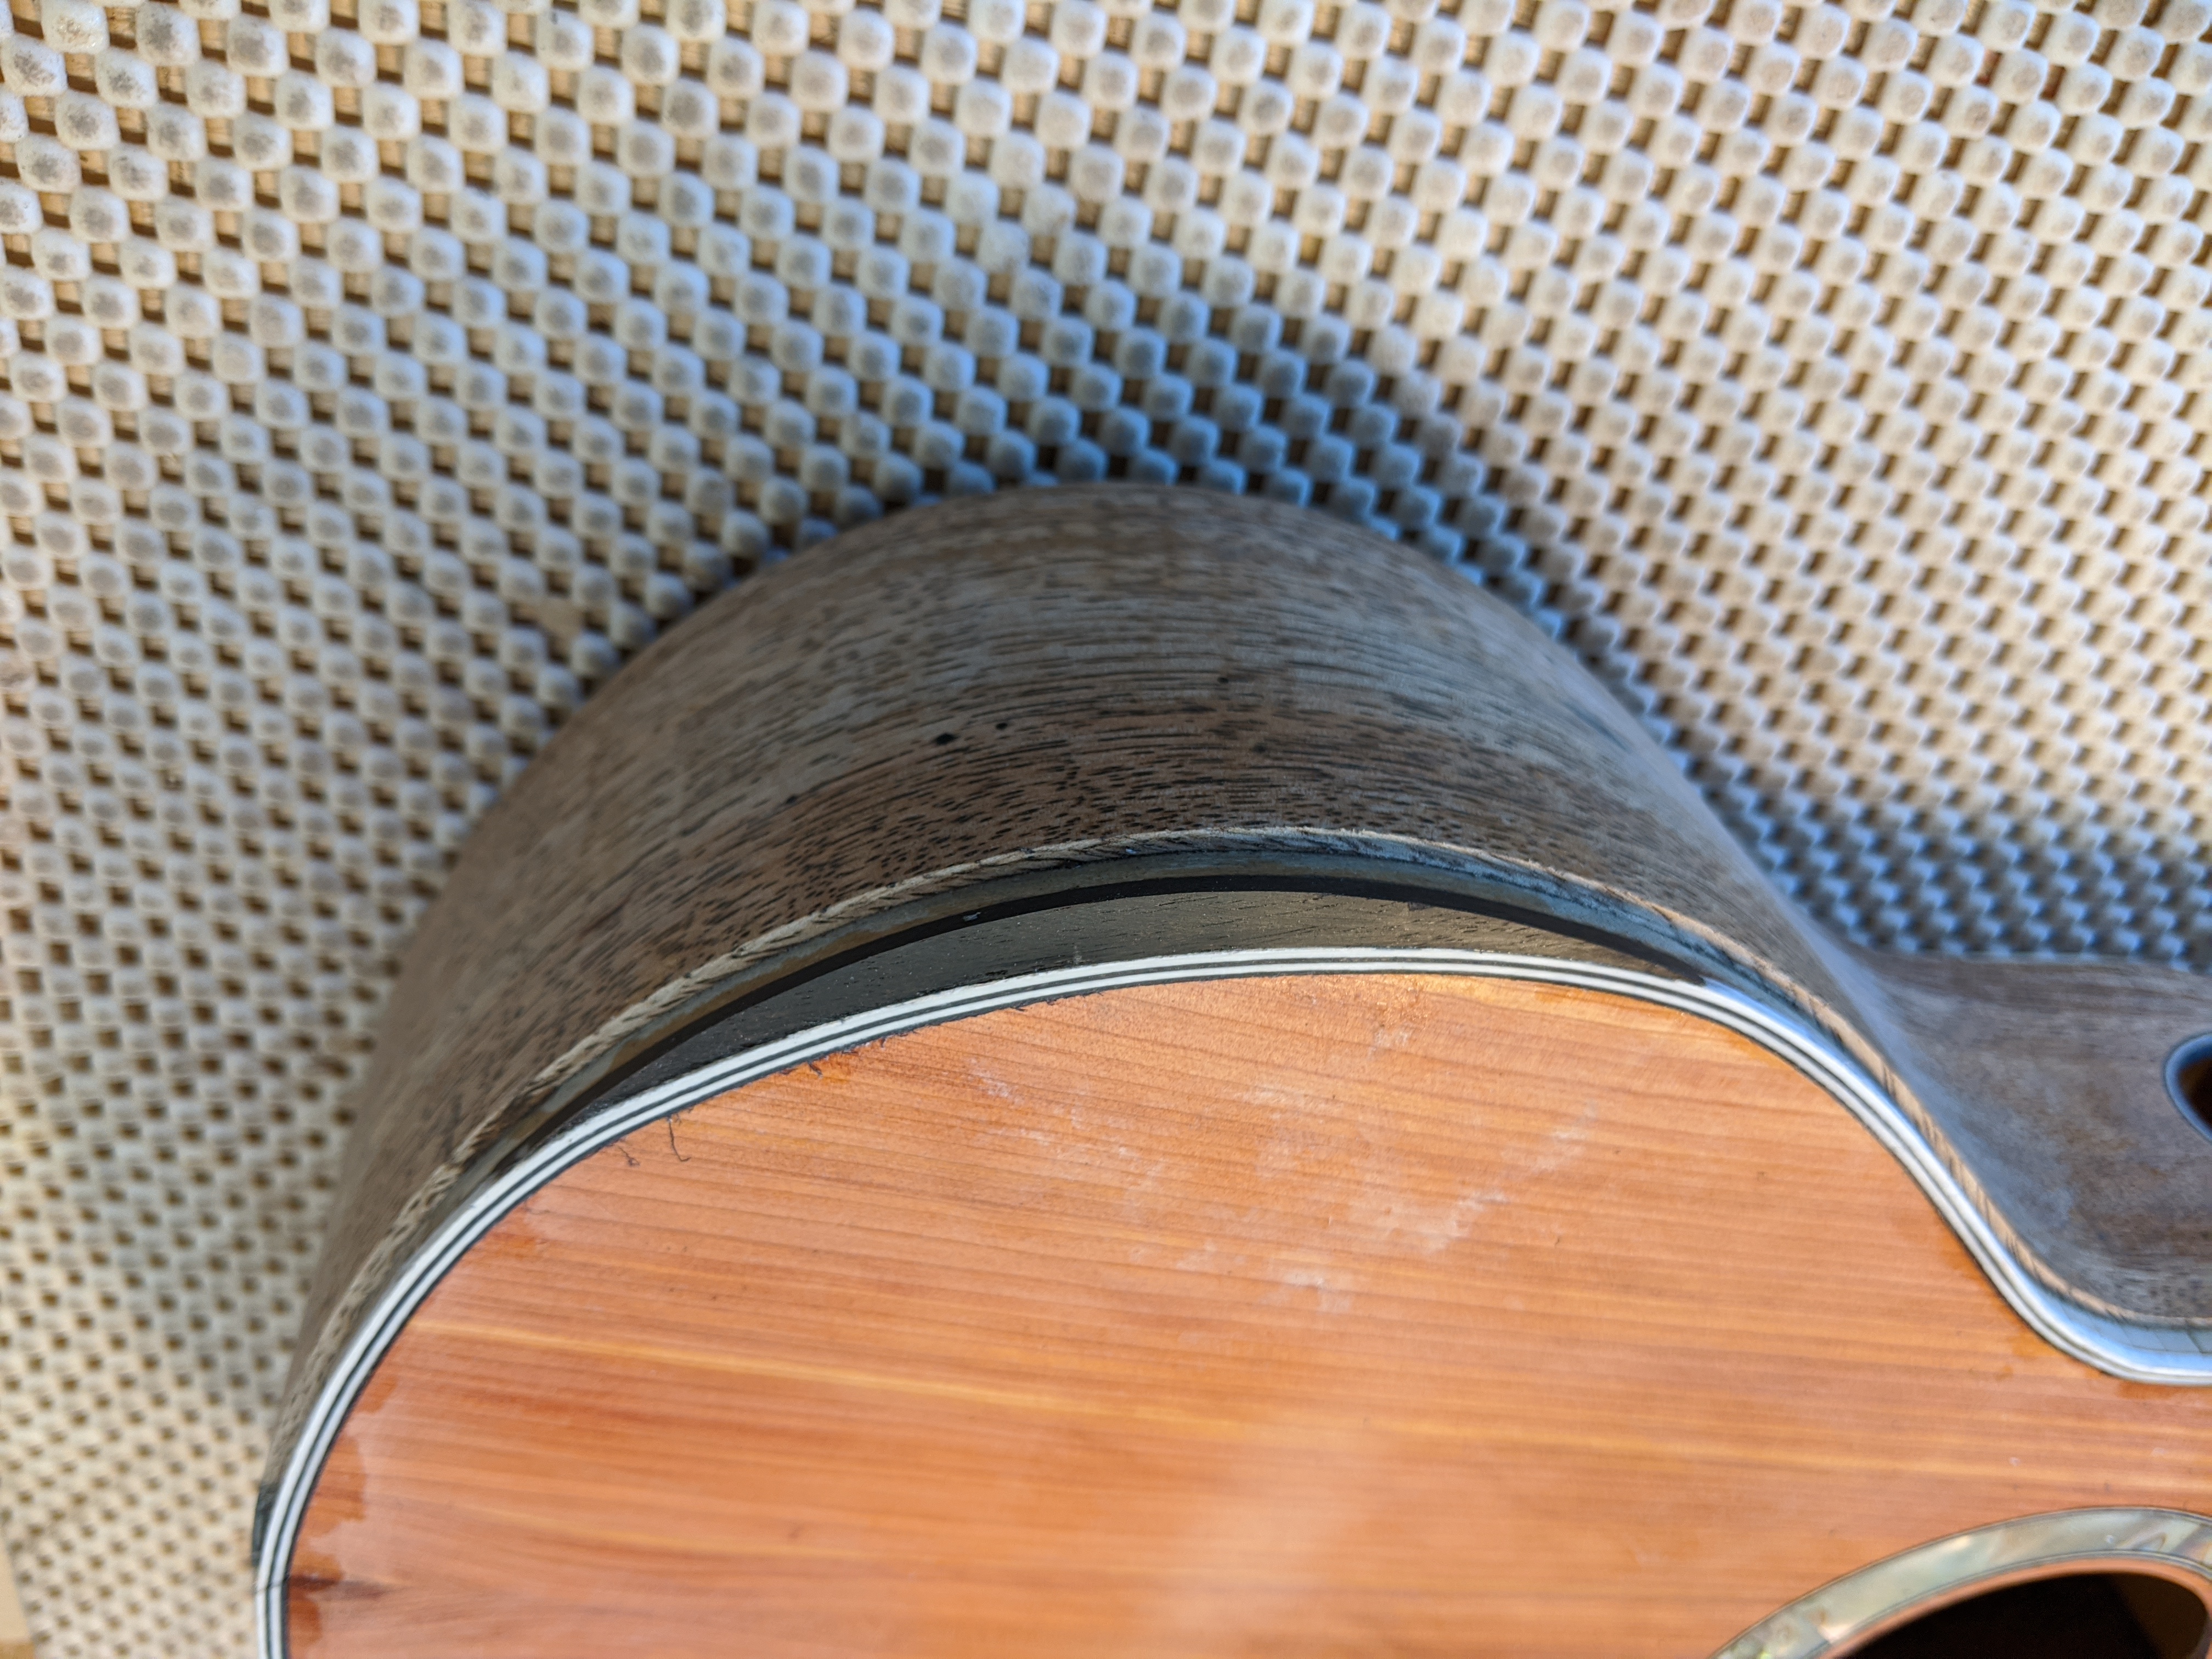
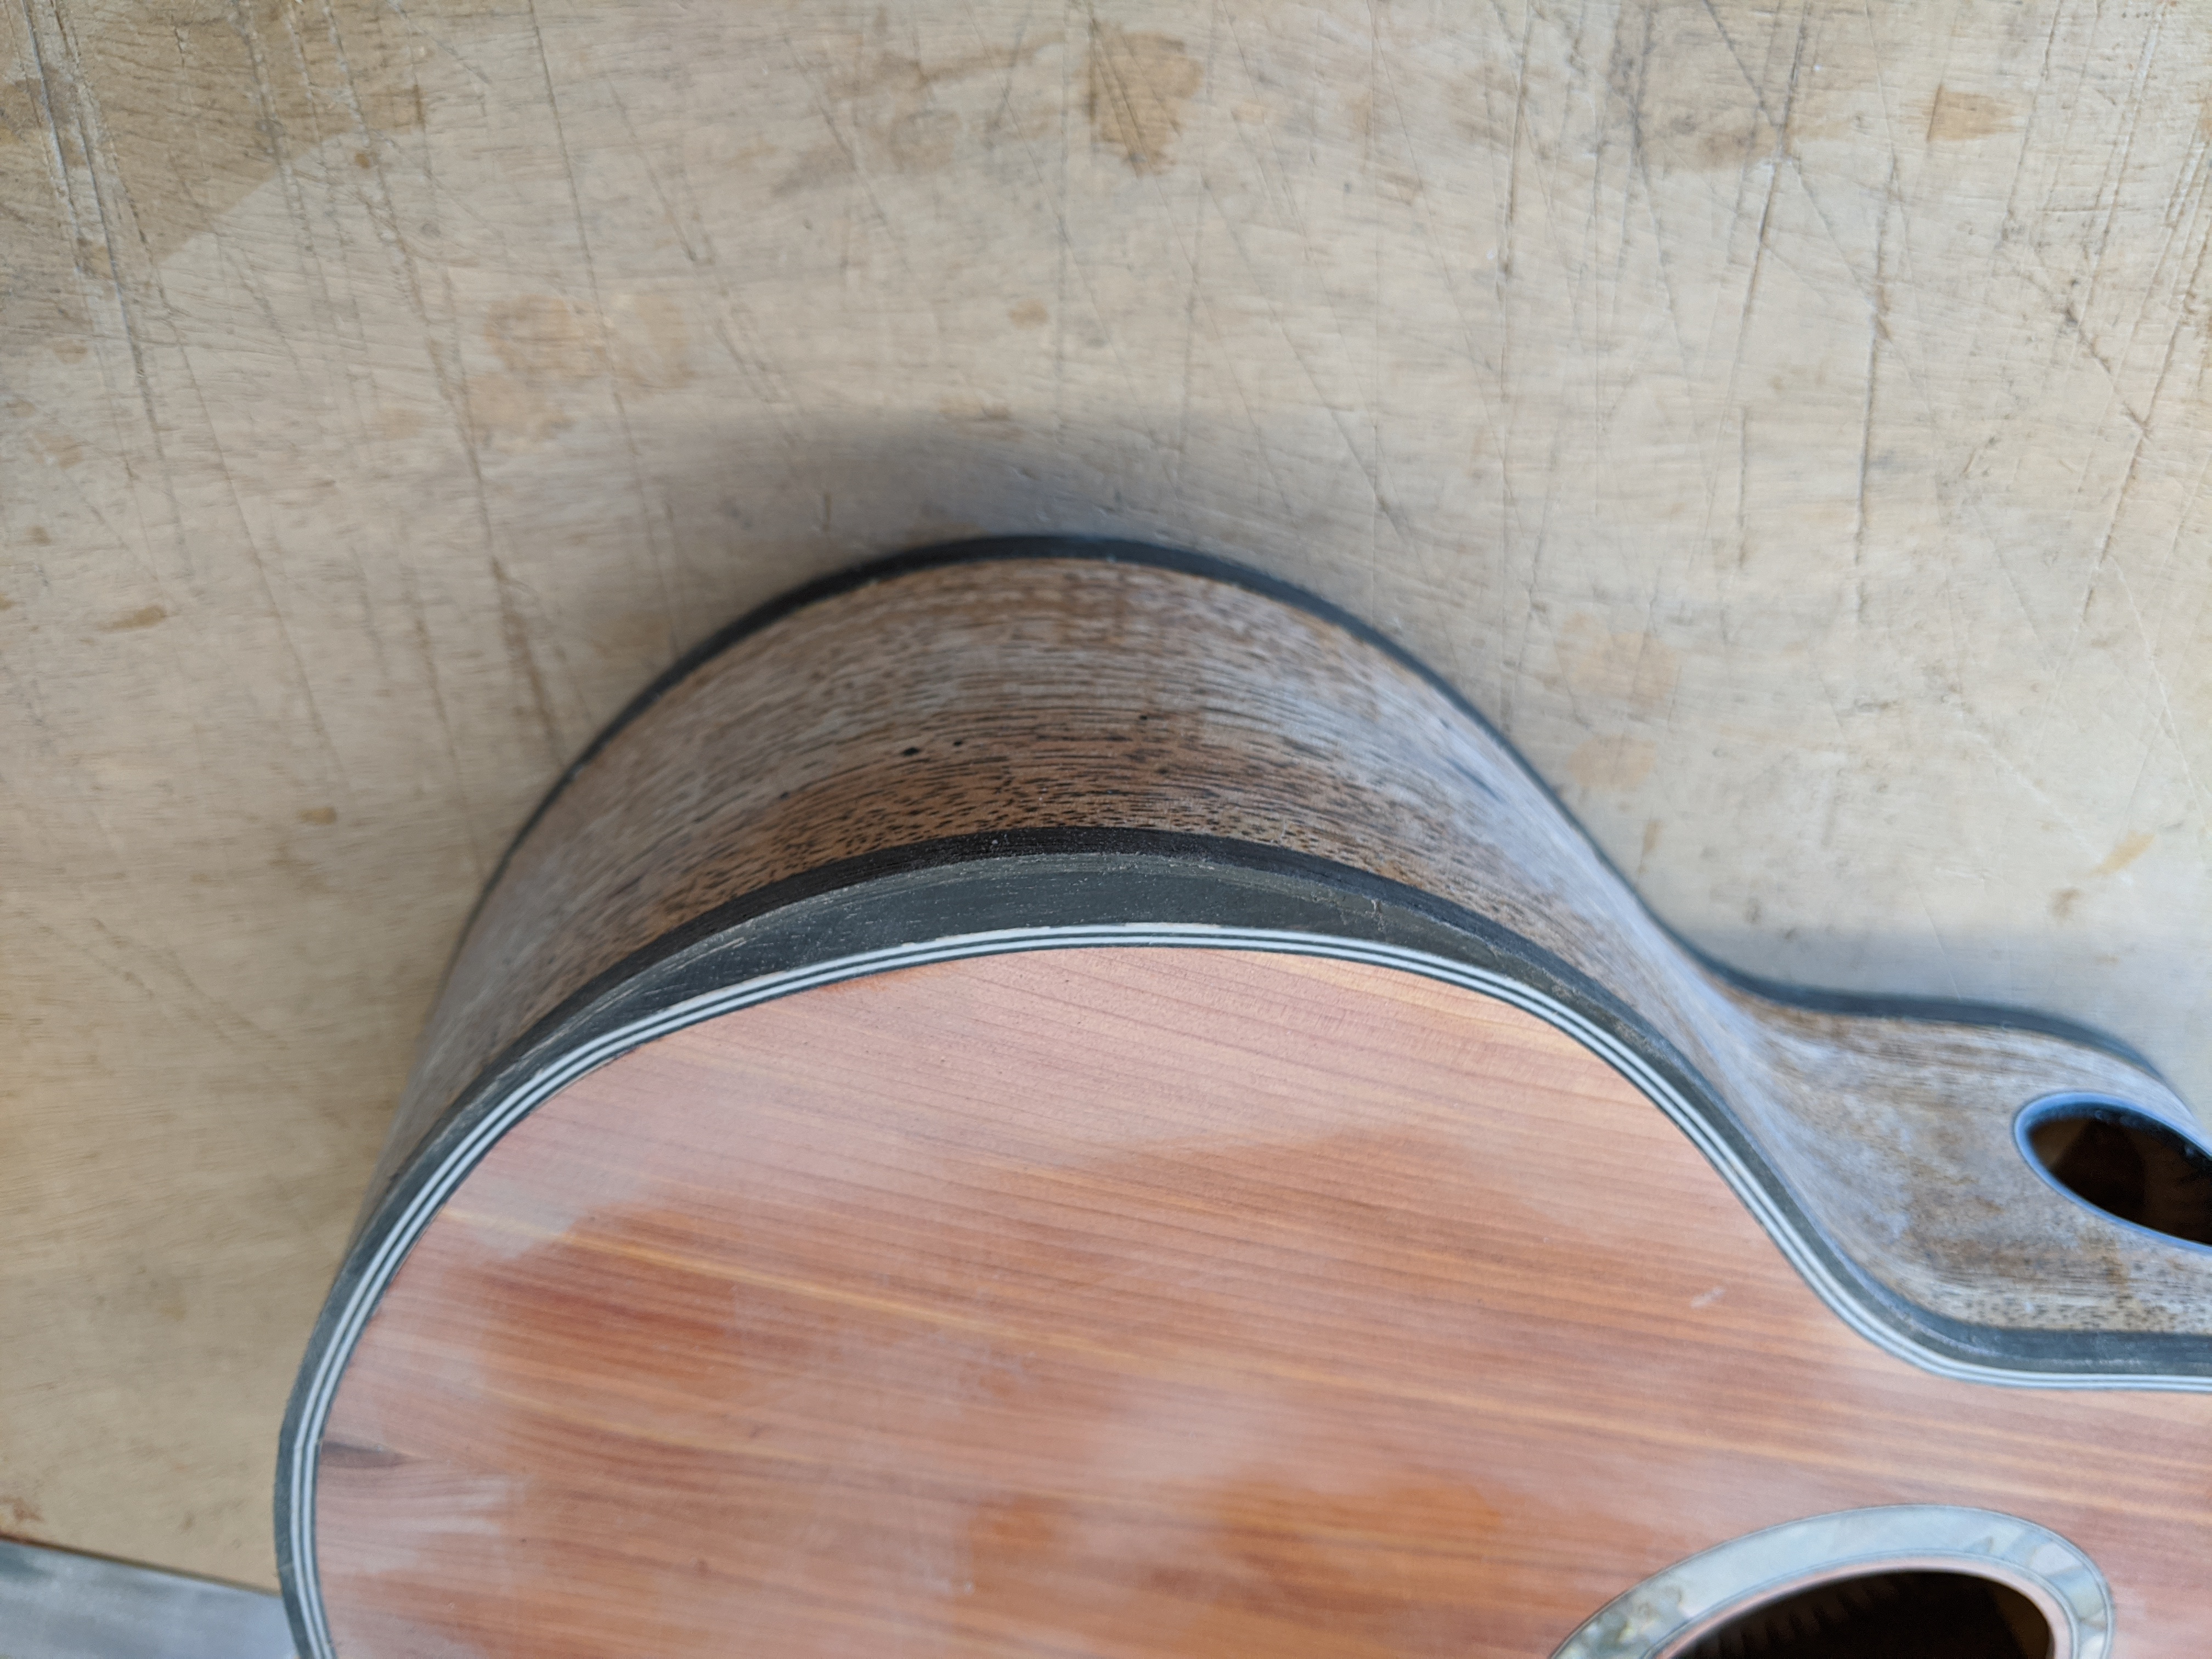
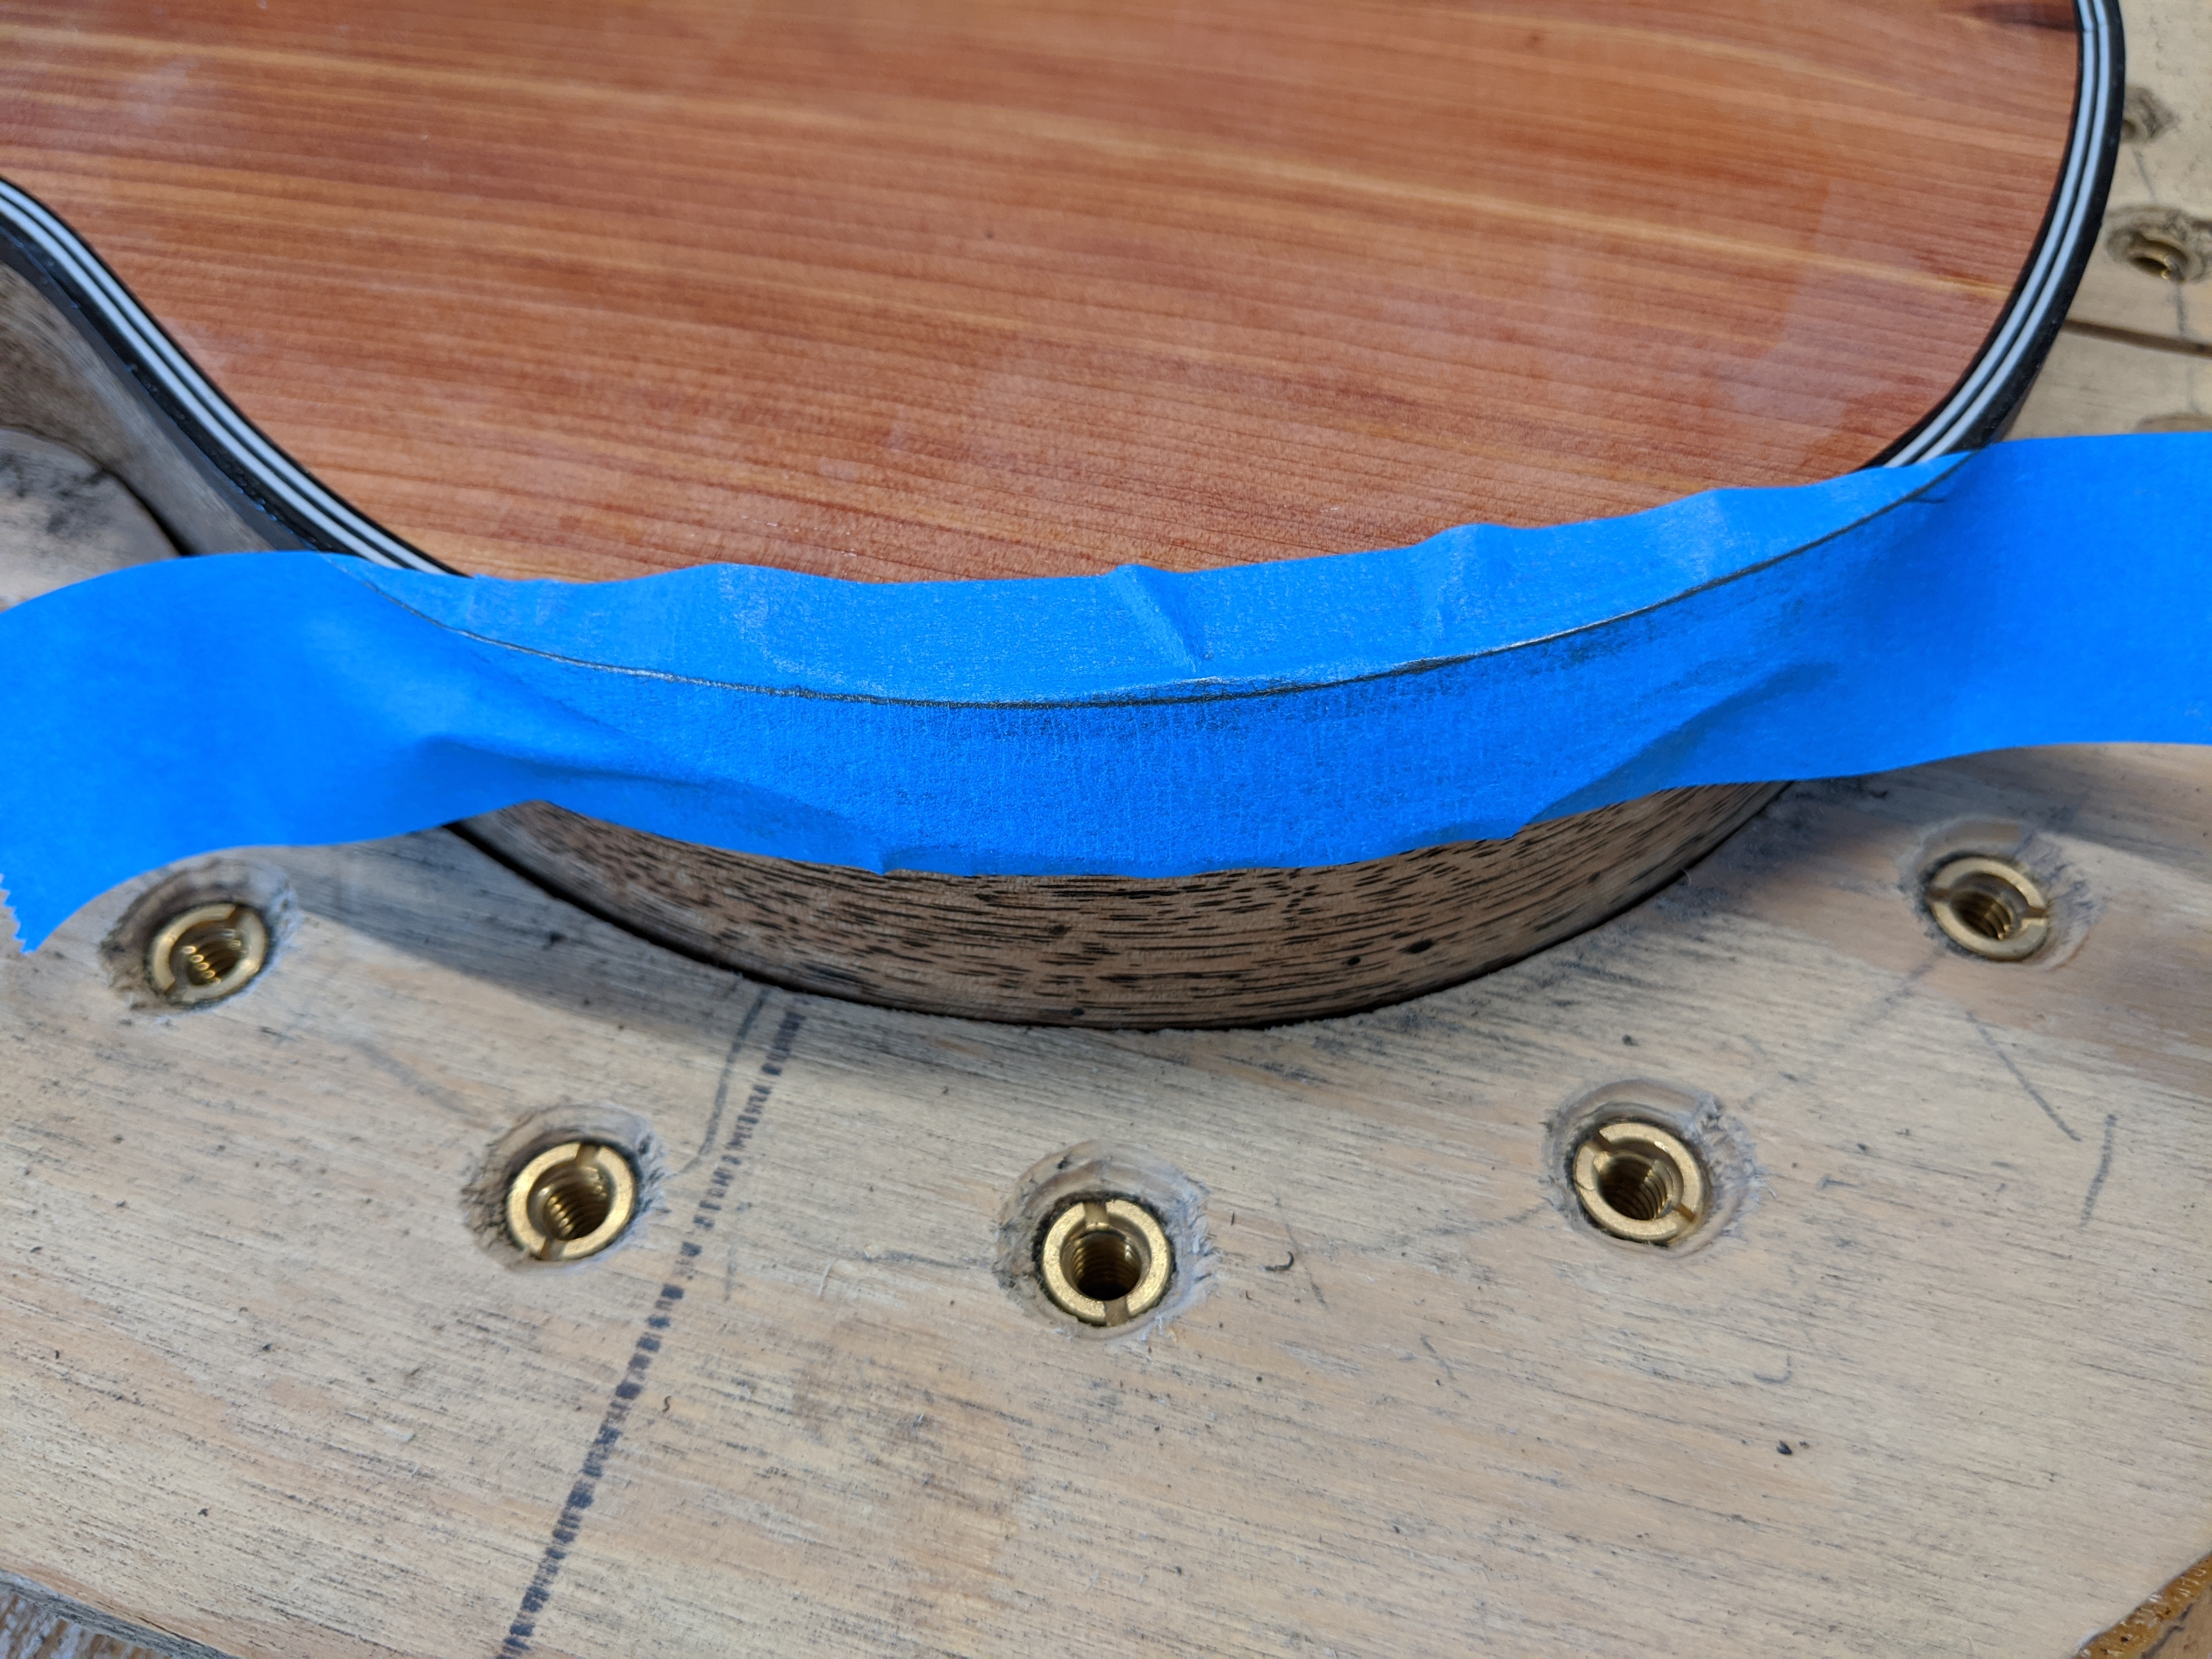
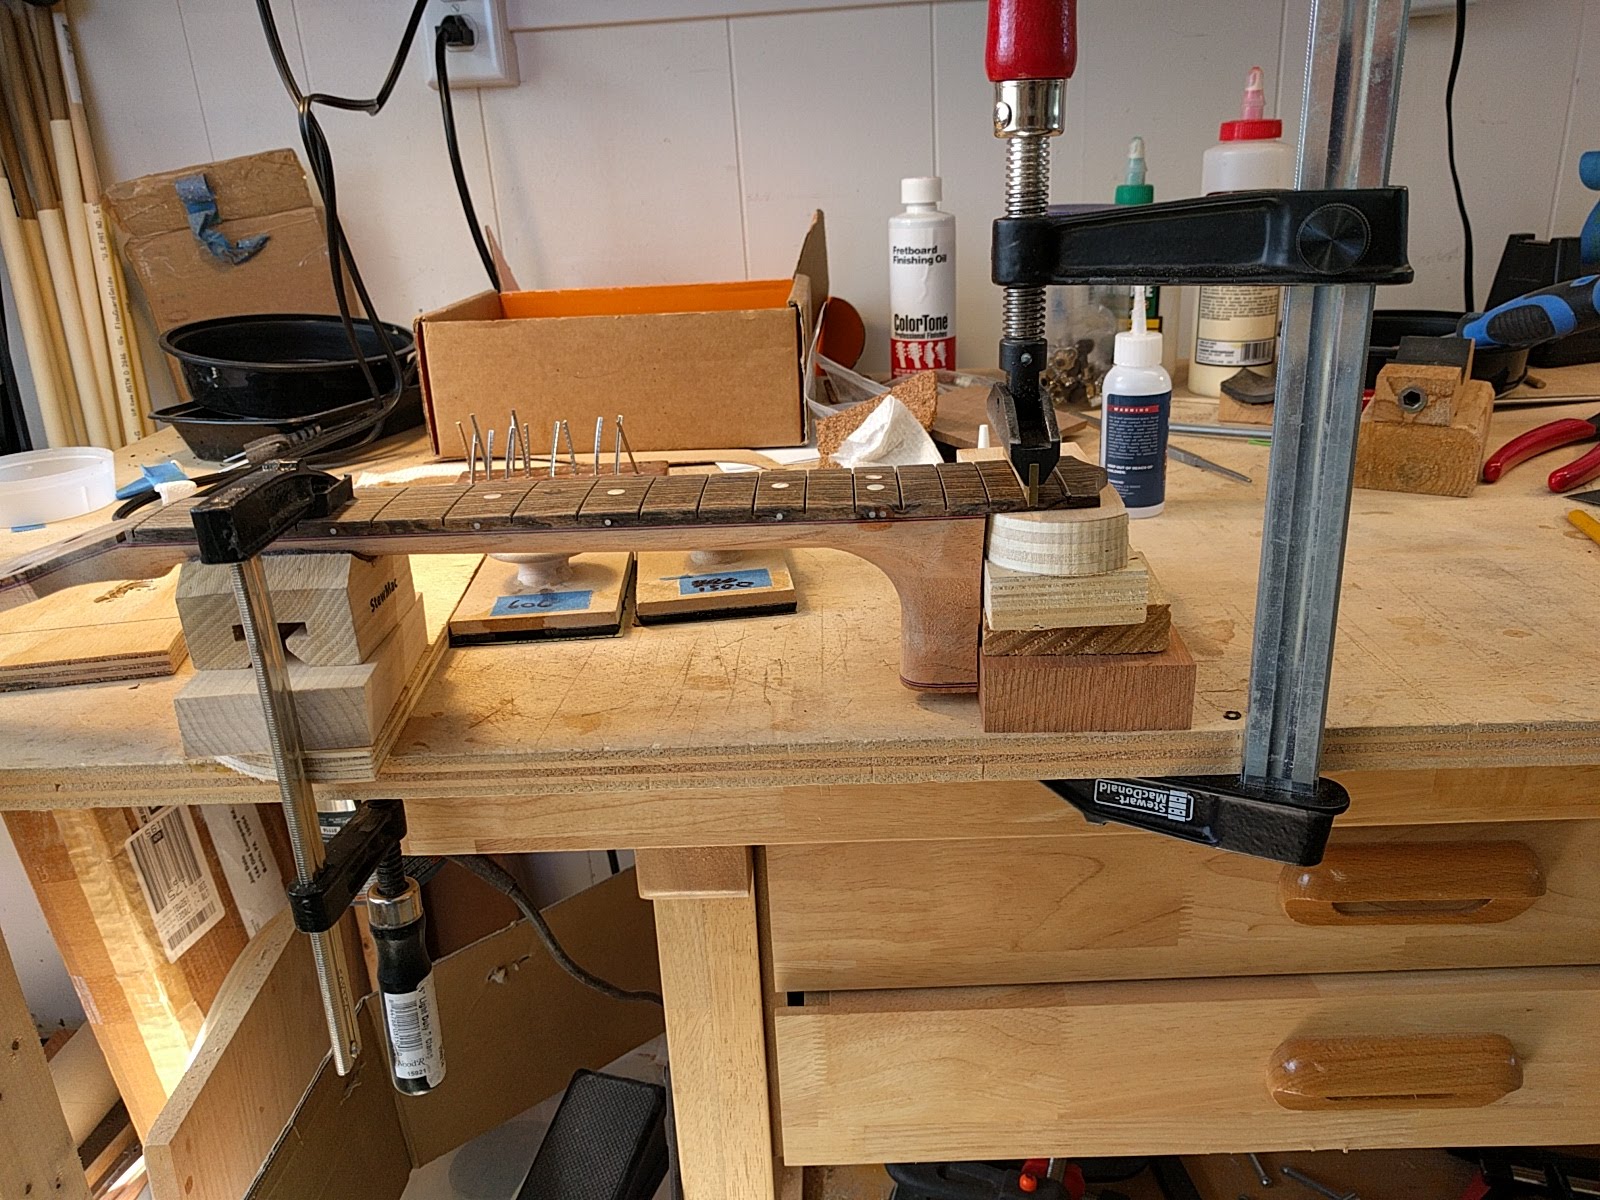
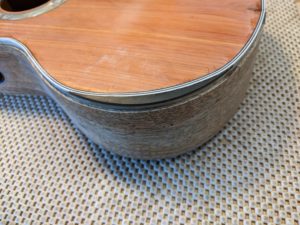
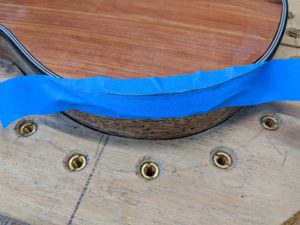
Then the arm bevel was cut with files, down through the binding and ebony in-fill, leaving just a binding width of the ebony next to the purfling lines.  When the bevel was cut I stuck on a piece of tape, and using a pencil rubbed the edges of the bevel to get a pattern.

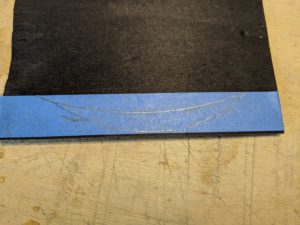
This tape is them peeled off and stuck onto a piece of black veneer to give a pattern of the veneer piece to be cut out and glued to the bevel area.  I have some thicker-than-normal black veneer so I used that.

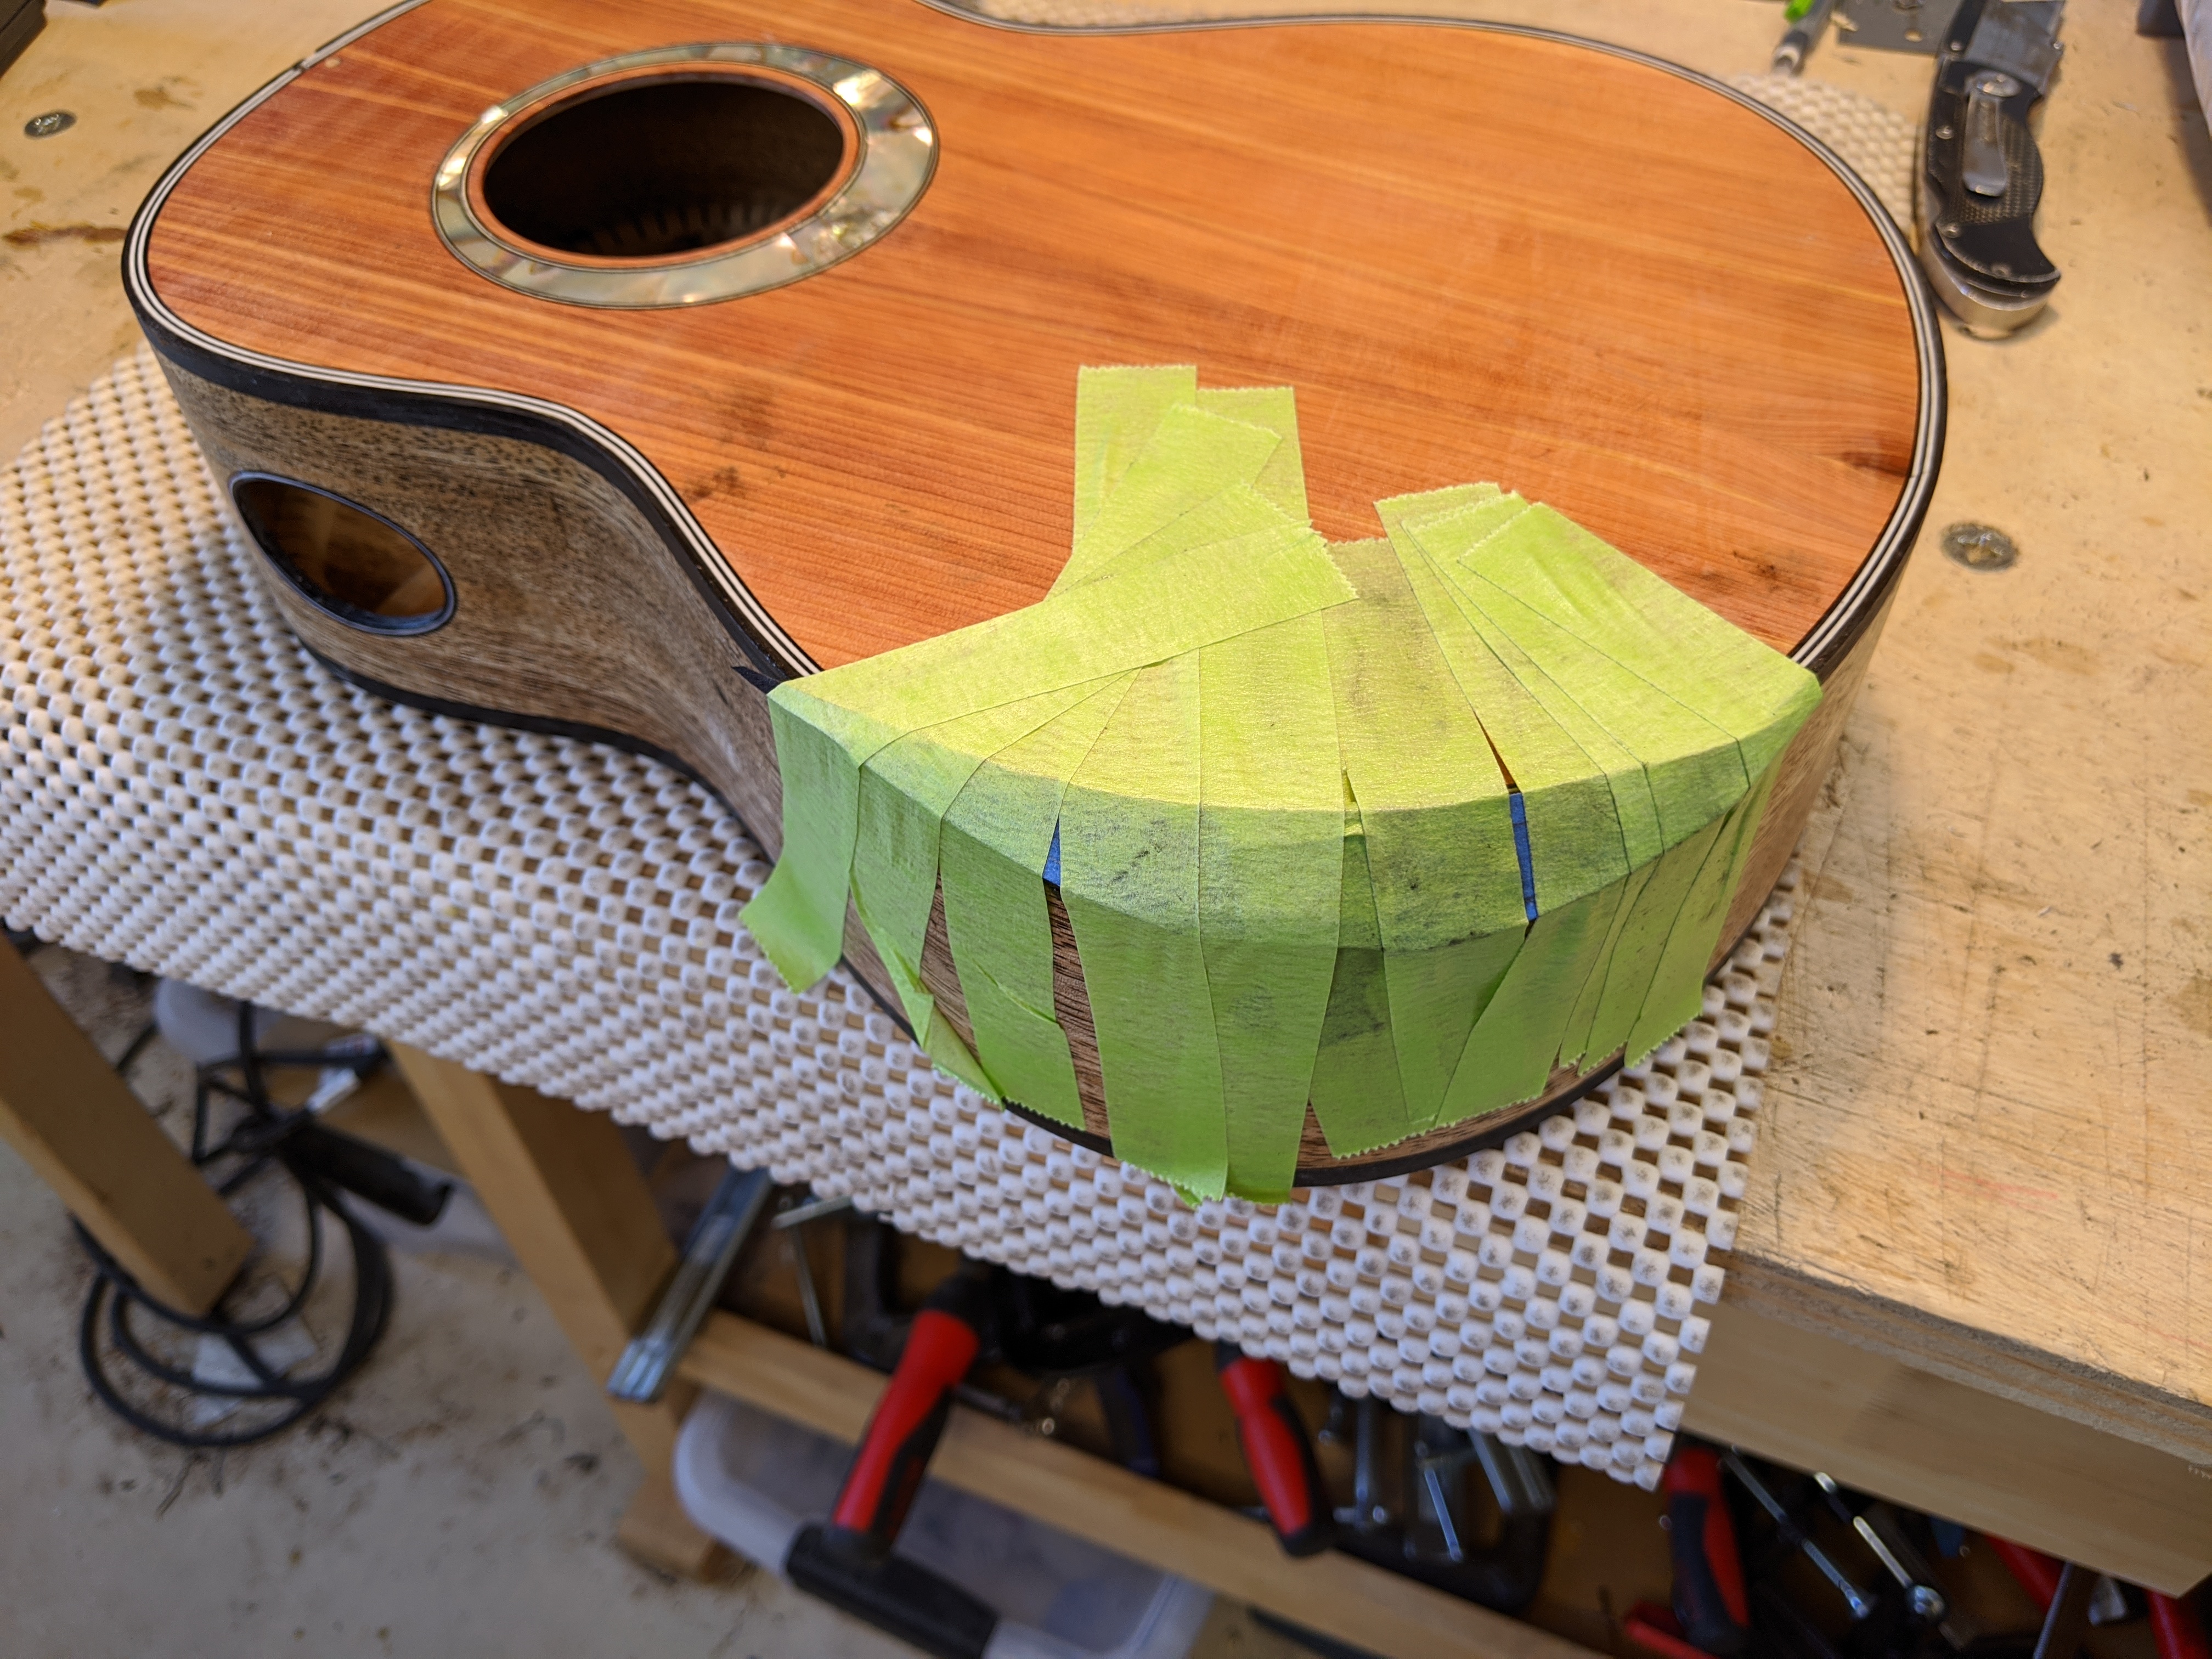
The veneer is cut out a bit oversized, and glued down with epoxy that is dyed black with black artist pigment.  The blue tape is left on while gluing to provide a bit or reinforcement to the thin ends of the veneer piece.  I taped the veneer down when glued with green tape as opposed to the brown tape I use for bindings because the green tape has a bit of stretch and I figured a bit of stretch would be good going over the rather odd shaped piece.

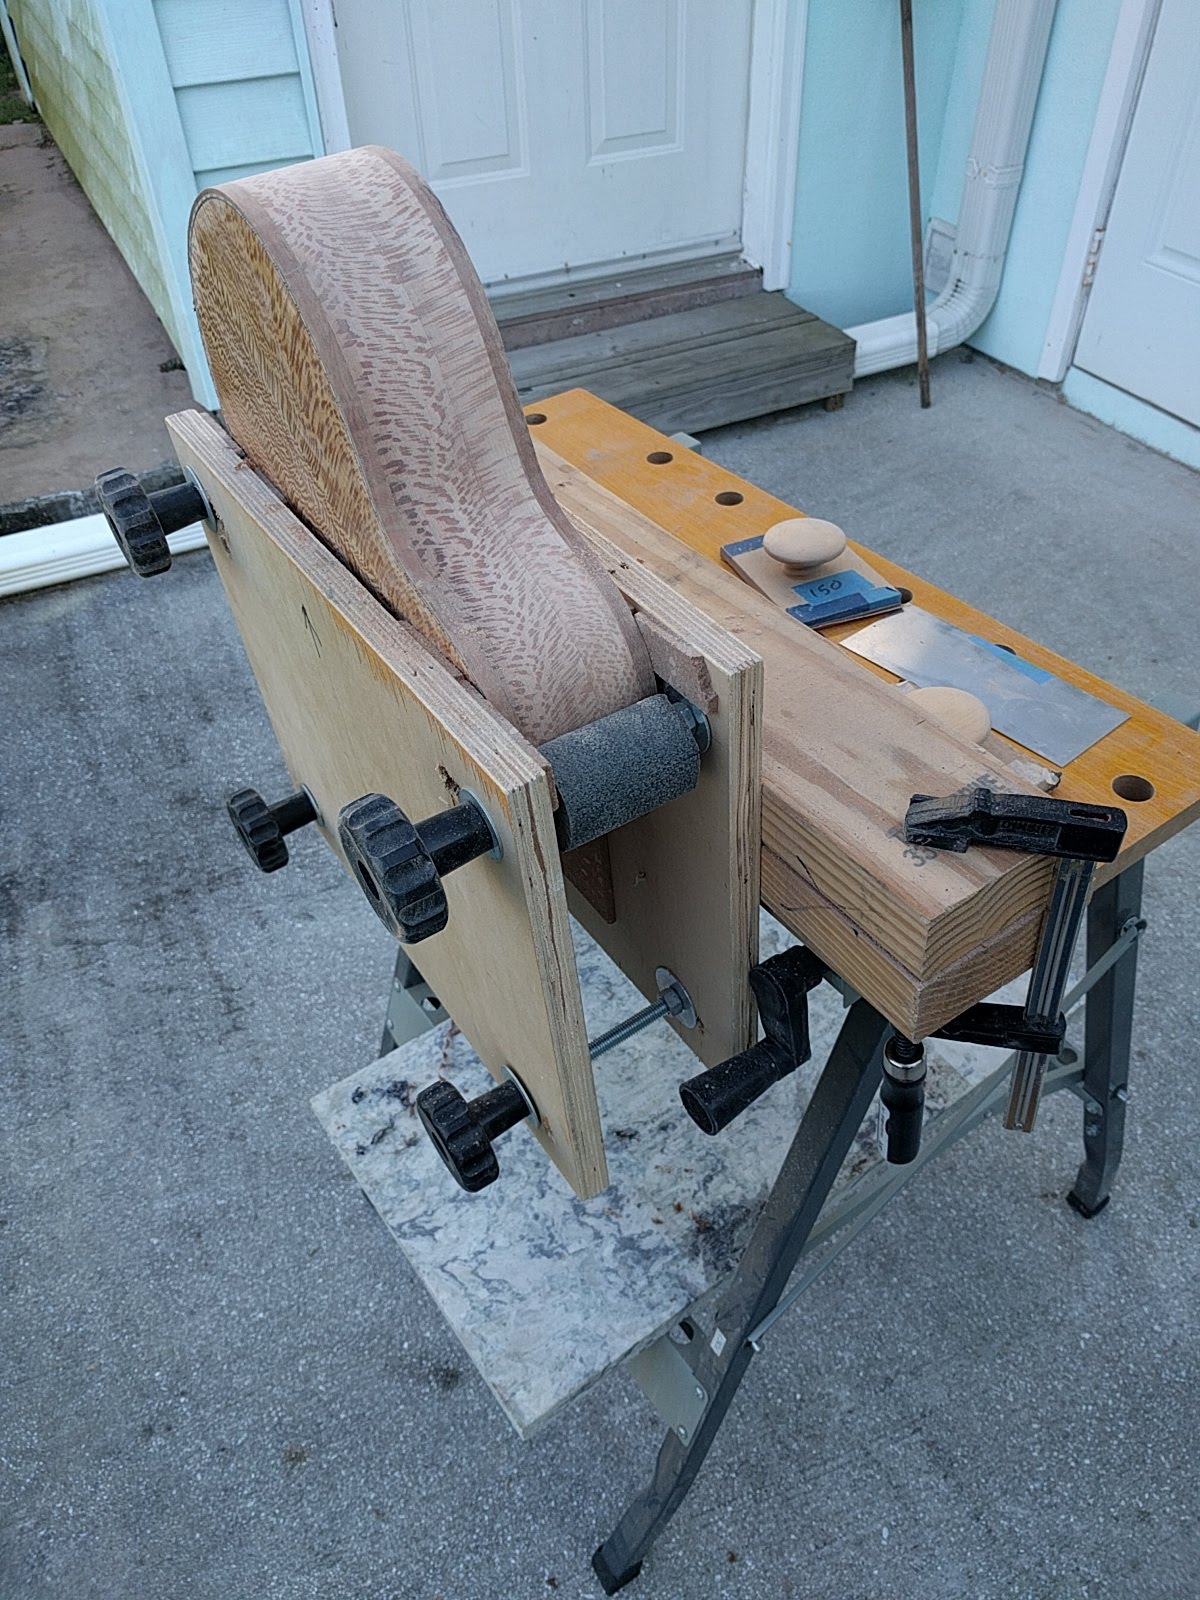
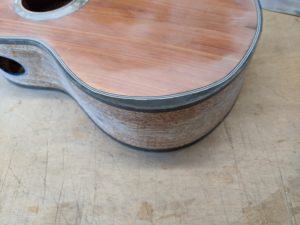
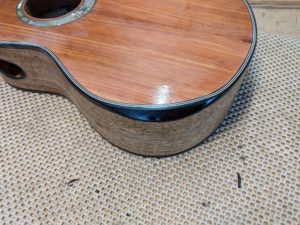
After the epoxy has hardened, the top and side of the bevel are carved & sanded flush with the top and sides, and it is blended into the binding.  The final result, with a first coat of sealer.

Lesson learned:

1) When designing the ‘inside’ line, where the bevel will go on the top, allow for the width of the purfling.  This purfling is particularly wide and the inside line should have been a bit deeper into the top to give more of a bevel.

2) I think the bevel should extend a bit further around the lower bout towards the waist.

3) I can probably use a smaller and lighter inside block.

More design changes to come after I let some players comment.

Nothing to fret about

Time to do the frets.  I fret after the fingerboard is glued onto the neck because it gives me one last chance to make sure the neck/fingerboard in its nearly final configuration is flat.  I fret before the final shaping of the neck.  I used to do frets after the neck was shaped and always managed to put some little dents in the neck which then needed to be sanded out.  The fretting operation as I do it is as follows.

If I am doing a radiused fretboard I first radius the fret wire with a home-made fret bending tool.  By adjusting the position of one of the bearing clusters I can vary the amount of bend to match the particular radius.

Once the fretwire is bent (if necessary) I cut it to the rough length of each of the fret slots with nippers, and stack the pieces in a set of numbered holes in a little block.

I started out in instrument making building banjos with bound fretboards.  When doing a bound fretboard you must finish the end of the fret before inserting it into the fretboard.  Even with non-bound ukulele fretboards I like the results of finishing the end of the fret before it is inserted.  I can easily get a nice round polished end, with no chance of damaging the fretboard which might happen if the end of the fret is finished after the fret is inserted.  So I cut the fretwire to fret lengths, and then file the ends.  The filing takes three steps.  First the end is filed square, then the tang is filed back at a 45 degree angle.  Cutting the back angle means that the tang is not visible from the side of the fretboard, and the tang will never stick out making sharp edges if/when the fretboard shrinks.  The back cut is in red.  The length is checked to make sure it is just a hair shorter than the fret slot so that the fret does not protrude beyond the end of the fretboard.

When filing the fret is supported by slots cut in the end of a little cut-off board clamped to the bench.

Finally I file the crown to round the end and then polish the end with 600 grit paper followed by 1000 grit.

The fretboard is prepared by taking a 4 corner file and running it along the fret slot so that a little bevel is created along the top edge.  This is because the fretwire is not exactly square where the tang meats the crown.  A little bevel of the top edge of the fret slot lets the fret seat flush on the fretboard much more easily.

I press the frets into the slots using the fret press clamp from Stew Mac.  However, rather than using the cauls that come with the fret press clamp to support the neck when fretting I find that I get much better control by clamping against the bench.  Also, rather than just pressing the fret into the slot, which can take a lot of pressure, I have found that by tapping the edges of the metal caul that holds the radiused brass insert the fret seats much more easily.

I also run a bead of medium viscosity CA glue into each fret slot using a fine pipette tip on the glue bottle before inserting the fret.  This is to make sure that the fret is well seated in the fretboard, and that it stays seated over time.  The glue has a few minutes to harden while I file and polish the ends of the next fret.

Bodies are complete

All of the bodies are complete, with binding installed, sanded flush, made nice, and the first coat of CA sealer applied.  Now to work on the necks.

From left to right

concert in spalted mango

concert in spalted tamarind

tenor in sycamore

tenor in spalted tamarind

tenor in curly walnut

baritone in curly walnut

Sanding

The bodies of this latest set are all bound.  Now comes a lot of scraping and sanding.  First job is to level the binding to the sides.  I try to install the binding a little proud of the side since it is much easier to sand the binding down to the side than to sand the whole side down to the binding.  To make this sort of operation easier I have made a little portable ‘instrument vise’.  This is simply two plywood plates, one of which is screwed to a chunk of 4×4 which is easily clamped to the bench or an outside work table.  The other plate rides on 4 long bolts, covered with a bit of foam pipe wrap, with a set of knobs to tighten this plate to hold the instrument.  The plates are lined with cork, with one side having the middle cut out so that a convex back is gripped just by the edges.  This instrument vise works very well and makes sanding/scraping of sides much easier.

To sand things I use little pads (one visible above on the outside work table) that are simply 3×4 inch pieces of Masonite with wooden cabinet handles glues on.  I buy rolls of sticky backed sandpaper (PSA paper) that is quite cheap to buy in a large roll.  The rolls come either 3 or 4 inches wide, so a 3×4 pad fits either.  Some pads are just Masonite for a really flat surface.  Some I face with some 1/8″ cork to allow a little bit of give, and some I face with 1/4″ wetsuit neoprene for a really ‘soft’ surface.  These neoprene ones have a smaller Masonite backing so the neoprene hangs out giving an easily curved surface for sanding those inner curves of an instrument body.

These pads, and the support they provide, make things easier on the hands (you are not trying to grip sandpaper around a block) and the paper lasts a long time since it is not flexing as with hand sanding.  All of the above however does not change the fact that sanding is not my favorite part of building instruments!  Still, when one can take things outside so the dust just blows away, and work on a sunny south Florida day, looking out at the pond, watching the ospreys, things could be worse.

Side sound ports

What;’s going on here?  (Such a mess, but it always seems to end up that way)

I putting in side sound ports on the latest batch.  Before cutting the sound port I glue in a little patch of thin wood/thick veneer, with the grain cross-wise to the side grain to strengthen the area.  I like to do this, and to cut and finish the sound port before the kerfed lining is put in because the patch can extend the full width of the side, and it makes cleaning up the veneers that bind the sound port much easier.  The patch looks like this:

To cut the hole I use a little pattern jig that clamps onto the side.  This has an over-size oval hole against which a template guide for my small router rides.  By varying the diameter of the template guide I can cut different sized holes, so one jig works for all instrument sizes.

I bind the edges of the sound port with veneers to match the binding on the instrument.  These are pre-bent on a hot pipe, and then glued in place with CA glue and finger pressure behind a piece of teflon grill mat to which the CA does not stick.

The final result looks like:

And here they all are.