These are a few of my least favorite things

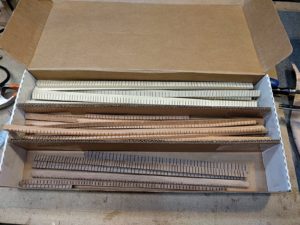
I was running low on the kerfed lining that is glued to the side to provide a ledge, meaning expanded gluing surface, for the top and back.  I make my own because few places make the “reverse” style of kerfing I use, no-one makes it in a ukulele size, and I get to use wood that is not commercially available as kerfing.  I try to match the tone of the kerfing to the tone of the sides.  I use a light colored kerfing (my local poplar) with light colored sides, some Spanish Cedar (kind of looks like mahogany) with brown sides, and new for this time around I made up some walnut kerfing to try out, see how it flexes, etc.  It works well, and makes a nice dark kerfing for dark sides.  I making a walnut baritone, and it gets walnut kerfing, so when you look inside all you see is walnut.   You can’t do that with commercial kerfing.

Making kerfing however is somewhat laborious, repetitive, and not very exciting.  Just one of those things one has to do, so when I get in the groove I try to make a bunch.  The most mind numbing step is cutting all those little kerfs (slots) to make the strip bendable.  I have a jig for the bandsaw to help, but still it is a lot of little cuts.  Take a break every now and then.  You don’t want to get complacent/drowsy/not paying attention around a band saw!

Anyway, three colors/woods of kerfing:
bling, bling, bling – the phones for you

The feeling among luthiers that I have read or spoken to is that the back and side woods of an instrument, in spite of rhetoric to the contrary, contributes maybe 10% – 15% to the overall sound.  A famous Spanish guitar maker Antonio Torres even went so far as to make the back and sides of a guitar from paper mache to show how unimportant the back and side woods were to the overall sound.   See https://www.classicalguitardelcamp.com/viewtopic.php?t=29408 for a reference.

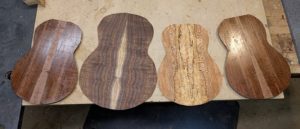
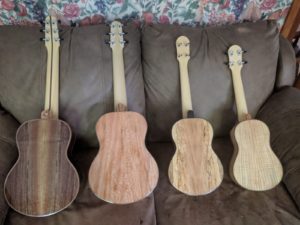
The traditional ukulele has a hardwood top, matching the back and sides, the all-koa ukulele is a classic, and in this case the top can be quite stunning.   However, I prefer the sound that one can get from a softwood top.   So the back and side woods are where most of the visual ‘bling’ comes from, since the top is usually a straight grained, evenly colored softwood, at least the way I build things. (See some of my streaky redwood tops for a somewhat more visually interesting top that sounds great.)  So, the back and side woods are there for visual interest, more so than musical tone, and thus the look and ‘bling’ is important.   In that vein I present the four backs I’m currently working on.  As a somewhat new way of working I gave then an initial coat of sealer now, before the body is assembled, since it will help protect against accidental scratches and the like, and I’m not going to be gluing anything to the outside, so why not do it at this stage.  In order:

casuarina tenor, black walnut baritone, spalted sycamore concert, casuarina tenor:

time to stretch out

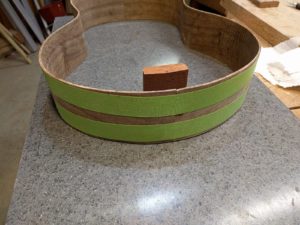
Another good use for that stretchy green tape.  When gluing the end blocks to the bent sides, I take a piece of tape, stick it down on one side, then streeeeeetch it out and stick it down on the other side.  This pulls the joint really nice and tight, and keeps things in place while I glue in the end blocks.

The choice is made and implemented

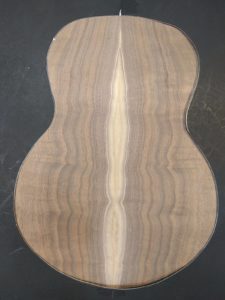
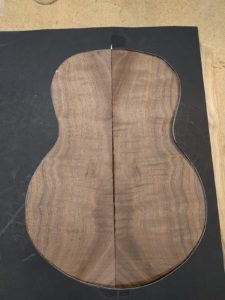
I now that you are all waiting anxiously to see how that walnut back gets put together.  Well, so you can sleep at night again, here is the result.  Both the luthier and the customer agreed that the ‘middle road’ on the sapwood was best.  Not too wide and not too thin.  I cut things down and glued the back up.  I really like the result.  There are little things like the bright edge in the sapwood just before it hits the heartwood that makes things really interesting.  I think that doing various trial bookmatches ‘photographically’ was really valuable in this case, because I do not think I would have discovered this particular layout by just overlapping the wood and trying to imagine things.

All glued up:

waste not want not

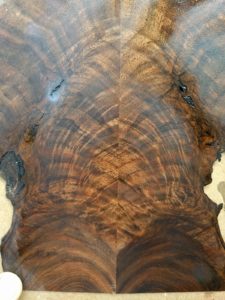
The board from which I cut the walnut sides which are the subject of then earlier discussion, had a knot area on one side.  I could get the longer sides from below the knot which is one reason I bought the board.  Just enough dimension to get baritone back and sides out of the board.  Still, that knot area had a really wild grain around it, so I sawed it up into thinner slabs just like the sides.  Looked good, so I book-matched two halves together which gives enough size to make the headplate for this instrument.  Could not resist putting a first coat of sealer on to see what it will look like.  Waste no want not.

simple but effective

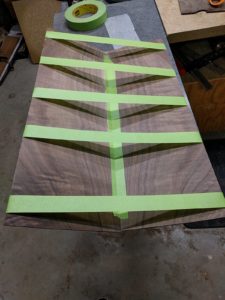
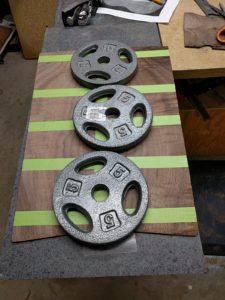
When bookmatching tops and backs, one has to (of course) glue together two fairly thin pieces of wood.  (They are taken down to the final thickness after being glued together.)  During the gluing process one has to clamp the two halves together (again, of course).  I have tried various ways of doing the clamping, made some gluing/clamping boards with threaded pressure things on the side, made a board to use the old ‘rope’ & wedges way of joining halves, etc.  I don’t remember where I saw it, but my current technique, which works very well, particularly for plate halves which do not have parallel outer edges, is simplicity in itself.  All it takes is tape, a flat surface, and a couple of heavy things.

To start with, the flat surface.  I use a chunk of Corian counter top.   Counter top material, (granite, quartz, Corian) can be had real cheap from any countertop fabricator.  Things like sink cut-outs make great absolutely flat surfaces in the workshop and are a waste product of the fabricator.  I have a number.  Anyway, I first lay down a strip of wax paper.

Then one bookmatches the halves together, looking at the ‘show’ side that will be seen, sliding them along each other slightly to get the best possible match.  When you get the right position, tape the halves together to hold the position with a small piece of tape.  Then turn the package over (you are now looking at what will the the inside or ‘hidden’ side) and put a long piece of tape along the seam to make a hinge.  Remove the small piece of tape from the show side.  Then hinge the sides up into a ‘V’ and place tape across and over the edges.  The tape I use is Scotch 233+ which has a fair amount of stretch.  The stretch-ability is important.  Place tape across the ‘V’ every couple of in inches.

Then flip the package over, apply glue along the edges (the tape hinge holds the glue in the seam) and then press the package, still in a ‘V’, down on the strip of wax paper to make sure the edges of what will be the ‘show’ side are down and flat and even.  Then gently bend the ‘V’ down flat, stretching the tape.  When it goes flat there will be very little force springing it back up into a ‘V’ since the stretch force is now directly almost perfectly horizontally.  It is overkill but I use a couple of handy barbell weights to keep things down as the glue dries.  The tension of the tape stretch is quite strong, without being so much that the glue joint gets ‘starved’ of glue from too much pressure.

Let the glue dry, strip off the tape and wax paper, and you are done.

photographic bookmatch

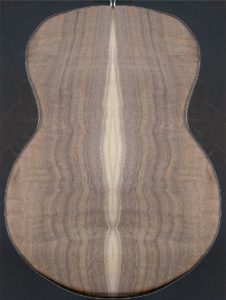
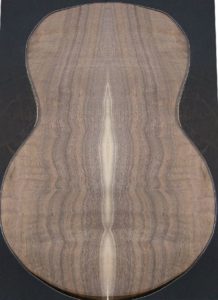
As a continuation of the last post, about how to do the bookmatch of the walnut back.  It is somewhat difficult to see what the bookmatch would look like if one cuts off varying amounts of sapwood, or angled the boards a bit since just overlapping the boards gives a pretty muddy picture.  Something I have thought of trying, since it is hard to visualize just overlapping boards, is to do the bookmatch ‘photographically’, by cropping a picture image and pasting the two halves back together.   It works pretty well, and is not hard to do.  So, continuing the ‘how to’ question, we have:

1) The full sapwood

2) smaller sapwood

3) really small sapwood


Oh the decisions that luthiers have to make

Starting on the next set of 4.

#50 – A ‘Florida’ tenor with casuarina (harvested in Florida by me) back & sides and cypress top.  The casuarina is from a log I have not used before, and it has a real nice ‘bees-wing’ type figure.  Should be stunning when finished.

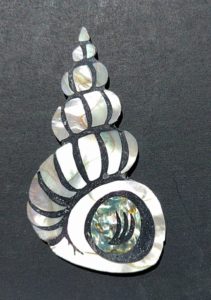
This ukulele will be a donation to the Bailey-Mathews National Seashell Museum in Sanibel Florida (my sister is executive director) for their winter fund-raising auction.   This will have extensive ‘mollusc’ inlays and the Baily-Mathews logo in pearl (which I have already done) on the headstock.

#51 – A baritone with curly walnut back and sides (walnut from my local sawmill) and an ancient sitka spruce top provided by the customer.

#52 – A concert in spalted sycamore and streaky redwood top, with a bit of what should be real fun custom inlay.  The ‘Piping Pig’.

#53 – A casuarina and curly redwood topped tenor, with a somewhat different rosette design and an interesting fingerboard/headplate, made from one piece of bocote so the grain is continuous up the fingerboard onto the headplate.  This uses the same casuarina, from the same log as #50, and has the same ‘bees-wing’ type figure.

Now, about that walnut for #51.  I got around to re-sawing the board this morning and it raises a design decision.  You see, the board has some really nice light sapwood, which actually has some streaks of color in it (not just cream white), though the curl is more pronounced on the other edge of the board, the part that was further into the center of the tree.  So, when one book-matches the two halves together, which way should one do it?

The first option it to have most of that sapwood in the center for a dramatic center stripe, though one loses a bit of the curl on what is now the outside:

Or one could cut back on the sapwood to make a more narrow center streak, and thus pull in a bit more of the curly outside.  (Here simulated by overlapping the two pieces:

Or one could forgo the sapwood entirely and do the book-match the other way, to get the maximum curl and walnut grain pattern:

Which way to go?  Hmmmmm….

I think I’ll bail out on this and let the customer decide.  How’s that for passing the buck!

(In case anyone out there is interested, I have one more set of this wood.  That is all I got from this one small plank found going through the stacks at the mill.)

4 finished

This set of 4 is finished (other than installing a pickup, for which I awaiting parts).  They all came out really well, with great sound.  Lots of volume, and sustain across the lineup.  The bracing system I have been evolving seems to work well across difference instrument sizes.   From the left:

Parlor guitar in black walnut and streaky water-tank redwood top and custom inlays

Guitalele in sycamore with a Pennsylvania red cedar top with the new spiral rosette and Picasso headplate

Tenor in spalted sycamore with a curly redwood top and extensive custom inlays

Concert in curly ash with a curly redwood top and new features such as a scoop, spiral rosette, Picasso headplate.


Low-G concert

I really prefer a low-G sound where the 4’th string is the low string, as opposed to the more traditional tuning where the 4’th string is an octave higher.  I think that with a small bodied instrument like the ukulele, anything one can do to bring out those warm lower notes should be attempted.  All concert sized ukuleles I have seen (or heard of) have always been high-G instruments.  However, I met a woman last winter who tunes her concert low-G.  “Oh really!” says I.  So I asked her what kind of strings she uses for this low-G concert.  She like Living Waters low-G concert strings, so I ordered a couple of sets direct from the maker in the UK.

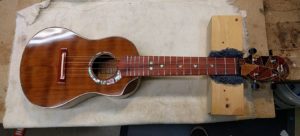
They sound very nice.  I am pleased.  I am also quite pleased with this instrument.  I built it as a sort of demo piece of a number of new things like a ‘scoop’, the new spiral rosette, a ‘Picasso’ headplate, side sound port, and 7 1/4″ radiused fingerboard.  Sounds great.  Great sustain and volume (particularly for a concert sized instrument) and that low-G really adds a nice balance I think.